I have a 2001 Ford Mustang with the Mach 460 stereo. It has the in-dash 6 CD changer. Since I bought the car in 2002 I’ve always wished that I could connect an iPod/iPhone to it and that it would do the speed sensitive volume control (SSV). I like the Mach 460 and didn’t really want to rip it out and replace the whole head unit. A couple of times a year I’d search the Internet looking for solutions but never really found what I was looking for. I did find where other owners of the same stereo used FM transmitters with some success to connect their iPod to the Mach 460. Some users reported having more success with the FM transmitters that actually plug into the antennae connector on the back of the radio. This allows them to stop any other FM signal on the same frequency from interfering. I tried a couple but they never worked well for me. I have an ATT iPhone that I use instead of an iPod. The ATT GSM iPhone always produced a lot of “chatter” over the stereo every time the iPhone connected to cellular data. I found I could reduce the noise by turning off cellular data on the iPhone but then that defeats the purpose of using the iPhone for not only mp3s but also Pandora and other online music services.
Recently I learned that my mach 460 is capable of speed sensitive volume control. If you turn the stereo on and hold the volume knob in for about 5 seconds you’ll see “Speed Vol 0” on the LCD. You can then use the up/down selection arrows on the right of the stereo to change the setting all the way up to 7. The issue is that even though the stereo is capable of it, in 2001 it wasn’t connected to the car, so it does nothing. I was pretty irritated when I learned this. Then a couple of weeks ago I found a posting on http://www.stangnet.com. The author describes how to connect a wire from the stereo to the car’s wiring harness to enable SSV. I’ll repeat some of the information here as I used it to add SSV to my Mach 460 at the same time I added an iPod/iPhone adapter. If all you want is SSV or you want to check out his photos you can get detailed info at http://www.stangnet.com/2002/03/22/ford-mustang-speed-sensitive-volume-mod/ otherwise read on and I’ll tell you how I added SSV and an iPhone adapter.
After a lot of research I choose the USA-Spec model PA11-FORD1 as my iPhone adapter. I got mine from Crutchfield but it is available from a couple of other retailers as well. This adapter gets wired directly to your head unit so you have to remove the head unit to do this install. It appears to me that the Mach 460 head unit was designed to allow an external CD changer to be attached to it. The PA11-FORD1 makes use of this port to allow for the iPhone input. My head unit has an internal CD changer and no external CD changer. The Crutchfield website says that if you have both for some reason, you’ll have to disconnect the external one. To switch to the iPod/iPhone input you simply hit the CD button twice. Hitting the CD button twice before the adapter is installed does nothing. All of the necessary adapters come with the PA11. It really isn’t that hard to install but you’ll need to take your time so it could take you a couple of hours. I’ve had mine installed for a couple of weeks and it is working well. I leave cellular data enabled on my iPhone and I have yet to hear any GSM interference. The PA11 also charges my phone.
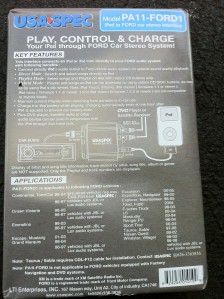
Clicking on any of my pictures will open them up in a new window that is much bigger and easier to see.
The Crutchfield website warned me that this adapter might not work in my car and that my stereo needed a “Comp” button, which I don’t have, but the adapter works fine. I have noticed a couple of strange things but they don’t stop me from enjoying the PA11. First, I need to plug my iPhone into the adapter about 10 seconds before I start the car. If I don’t, some times when I hit the CD button it says No Mag. I’m assuming this means No Magazine found and is being caused by the head unit not seeing the iPhone. This doesn’t happen a lot but is annoying when it does. Plugging the iPhone in first must allow it to be recognized by the PA11 which in turn presents it to the head unit when you fire up the car. If you start the car first the head unit must search and doesn’t see the iPhone and never searches again. I haven’t yet found a way to cause the head unit to search again. Powering the head unit off and back on again doesn’t seem to do it. Second, the direct CD buttons 1-6 are used to change playlists when connected to the iPhone. They don’t seem to work for me but I can use the disk skip buttons to move between playlists and direct iPod/iPhone mode. Also note that the playlists on your iPod/iPhone must start with FORD1-5. This is explained in the instructions that come with the PA11. Third, I’ve noticed that if my iPhone was last in a non FORD playlist when I connect it to the PA11 it some times stays stuck in that playlist and the disk skip buttons do nothing. I must then dis-attach it, go to all songs and then attach it again to the PA11.
Okay, if you’ve read all of the above and are still here you must really want to do this 🙂 Below are the steps I used to get this done. I hope this helps you. If you find this information useful and would like to reward me for taking the time to write up these instructions, I do take donations via PayPal to strebe@charter.net Thank you!
Items I found useful during this process:
• 8mm and 7mm sockets
• Drill with 1/4″ drill bit
• Two wire taps. I like the ones that allow you to insert a spade connector directly into them. You can get these at RadioShack, Fleet Farm or online.
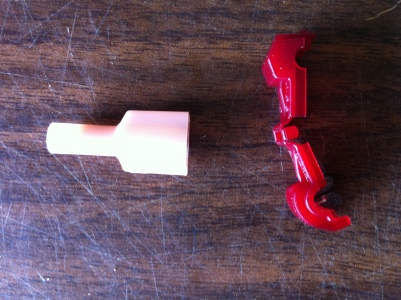
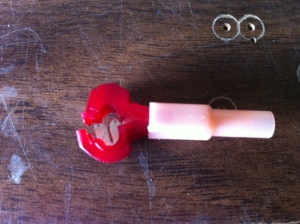
• 3′ 16-20ga wire. I used 18 gauge but am sure other thicknesses will work as well. Just make sure your spade connectors and wire are the same gauge.
• Two spade connectors and crimper. If you use the wire taps I suggest above then spade connectors like this one work well as the plastic around them helps hold the wire tap shut just in case it should ever come open. Which of course it shouldn’t if you’ve closed and snapped it correctly.
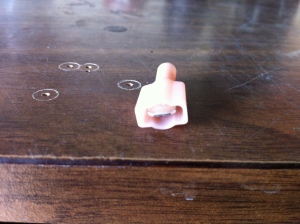
Steps:
1) Unlock both doors, then use the 8mm socket to disconnect the negative battery cable.
2) If you have a manual transmission you may need to remove the shifter knob. My Mustang is unfortunately an automatic so all I had to do was shift it to the lowest gear position for clearance.
3) Pry out portion of gear shift trim panel by pulling it out towards you. This may take a little time. Just be patient and carefully pull on it. It is just held in with some clips.
4) Disconnect the 12v power outlet wiring harness. Take your time and find where you need to press in on the connector to separate it. Remove the trim panel.
5) Pry around sides and bottom of receiver/climate control trim panel by pulling it out towards you. Once again take your time. Just be patient and carefully pull on it. Start from the bottom and work your way up. It is just held in with some clips. Don’t forget to unplug the harnesses from the backside of this panel so you don’t break the switches that control the rear defrost, traction control, and fog lights if you have them.
6) Remove the head unit by removing the 2 7mm screws from brackets under the head unit with the 7mm socket. Notice that the head unit slides on a rail on the bottom of it. Make sure that when you reinstall it, it gets back on the rail. Be careful not to drop the bolts. Chances are they’ll fall down by the shifter and you’ll lose them or it’ll take you 20 minutes to find one of them. I might be talking from experience 🙂
7) Disconnect the 2 wiringharnesses and antennae from the head unit. Make note of which plugs are used on the back of the head unit and which one is available. The middle socket should be empty. NOTE: The antennae wire simply pulls straight out.
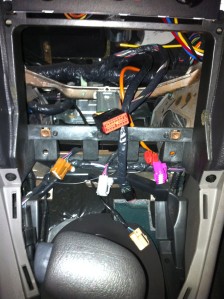
8) Crimp the spade connectors to each end of the 3 foot wire. If you prefer you can also drop some solder on them.
9) Run the 3 foot wire behind the dash on the passenger side and feed it through the head unit opening along with the other plugs for the head unit. You can leave the other end of the 3 foot wire on the passenger floor mat. We’ll get back to this later.
10) Now take a look at the back of the head unit. The center socket which was not previously used in a 2001 Mustang unless you had an external CD changer, is the socket that has the pin you need to tap for SSV. It is pin 9. Notice the pins are labeled in the socket. Pin 9 is in the center row, second pin from the right. Plug the PA11 wire harness in to the back of the head unit. Make sure the harness snaps in securely. Notice it has a pass through for the two sockets it uses. I found this strange since the center socket is for an external CD changer which you can’t use so why have a pass through for it. I’m guessing they use the same harness for many different installs.
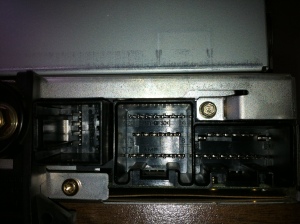
Clicking on any of my pictures will open them up in a new window that is much bigger and easier to see.
11) Fasten a wire tap on the wire that connects to pin 9 on the center socket. For me this was a Blue/White wire. Yours will probably be the same.

12) Set the head unit to the side for now and decide where you want to place the PA11 white box. I put mine in the center console as I wanted to be able to get to it easily and I wanted a place to hide the iPhone cable. I also have an iPhone holder that fits in the front cup holder meant to hold an ash try. I simply run the iPhone cable out of the center console and close the lid. This give me a pretty clean finish. You’ll have to to decide where to place your PA11 based on where you want to keep your iPod/iPhone. To place the PA11 in the center console, first remove the console box by removing the two screws in the bottom of it.
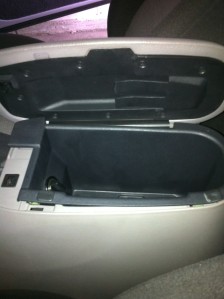
13) Disconnect the accessory plug harness. Take your time and find where you need to press in on the connector to separate it.
![Center console with 1/4]()
14) Drill a 1/4″ hole in the center console box. This will allow a path for the cable that connects the head unit to the PA11.
![Center console with 1/4]()
15) Run the PA11 cable through the center console and up behind the head unit opening placing it along side the rest of the plugs for the head unit. Feed the other end through the hold you drilled in the center console box as you are reinstalling the box. Don’t forget to reconnect the accessory plug harness.
16) Place the PA11 in the bottom of the console box. I used one of the console screws to secure the PA11 to the bottom to keep it from vibrating. Plugging both wires in the PA11 before you secure it will make it a little easier to get them in there. Also make sure you have the dip switches on the PA11 set to where you want them before you secure it. The dip switches basically allow you to enable/disable the RCA aux inputs on the PA11. The negative of enabling them is that you get one less playlist to access as disk 6 becomes the RCA inputs. I enabled the RCA ports even though I am not currently using them since I knew I really didn’t care too much about having one less playlist. I have mine on disk 5 most of the time which is direct iPhone access. This allows me to control the playlists from the iPhone or use other apps like Pandora or Slacker.

17) You can now reinstall the head unit. Make sure you securely fasten all of the plugs into the head unit. You now should not have any open sockets on the back of the head unit. All 3 of them should have a plug in them. Don’t forget to connect the new PA11 wire to the PA11 harness, the radio antennae back into the head unit, and the spade connector from the 3 foot wire you made to the wire tap on pin 9 on the center socket. Be sure to slide the head unit back in on the rail.
18) Put the radio screws, gear shift trim panel, and the receiver/climate control trim panel back on in the reverse order you took them off. You are now almost done. You just need to take care of the other end of the 3 foot wire for SSV.
19) Go to the passenger side and open the passenger door. Remove the pushpin in the passenger kick panel which is in front of the passenger door. The pushpin looks like a large button on the passenger kick panel. You just have to get underneath the pushpin and pull it straight out. It has ribs on it that hold it in place but will pull out.
20) Pull straight up on the passenger door floor trim panel starting from the front of the car. The first 2 clips should pop. That is sufficient.
21) Pull straight back on the kick panel and it will pop off. Set it aside.
22) You may have to pull some carpet back to give yourself some work area. Make sure there is plenty of light.
23) Locate the EEC wiring harness and bundle. This is the large bundle of wires that runs into many different connectors.
24) Find the WHITE wire with ORANGE stripe (WH/OR). There are a few different white wires with red stripes (WH/R), BE SURE you tap the correct wire. This will be the tricky part, since you are upside down and cramped, the colors look alike. Be patient, it will require you to peel back some of the black wrap. There are also almond or light tan wires with an orange stripe. Keep looking until you find the white wire with the orange stripe. You’ll know it when you see it. The bundle of wires is thick and it may be on the inside of the bundle. Once again, take your time. You don’t want to tap the wrong wire!
25) Once you find the correct wire attach your other wire tap to it and plug in your spade connector from your 3 foot wire.
26) Tuck the 3 foot wire coming from the radio away using zip ties, Velcro or other fasteners for a clean install.
27) Replace passenger kick panel. Installation is reverse of removal.
28) Reattach the negative battery cable.
29) Plug in your iPod/iPhone and set the SSV setting on the head unit to 7 initially and then adjust according to preference
30) Enjoy your iPod/iPhone and SSV 🙂


